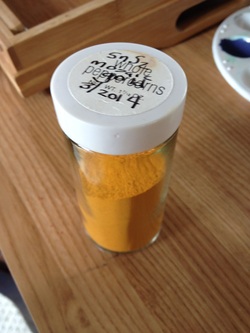
In March of 2014, I received SnS2, stannic sulfide, also know as Mosaic Gold in the historical context. This was part of the Great Mosaic Gold Distribution started by Master RanthulfR (Randy Asplund), webpage: http://www.randyasplund.com to get people out there working with a pigment that would have been used as a gold leaf substitute in historical period. Instead of using modern materials, RanthulfR wanted to promote this and I agreed it would be a fun experiment and would move my work closer to period practice. Mosaic gold is a yellow scaly crystalline pigment consisting essentially of stannic sulfide.
So a bunch of us went in on this purchase and I received 80 grams of the SnS2 to experiment with it. I divided 80 grams in half to give to a friend in the north (Hi, Camille) to further our artistic mischief. I put the mosaic gold into a nice, dry, class jar with a cover, labeled it and EVERYTHING. How exciting!
So over the next month, I was stupidly busy. I didn't have a lot of time to be able to experiment. During April vacation I actually had time so I took the pigment and added some gum arabic (a few drops) as the binder to temper the color, plus a little water to make it flow and painted some test swatches.
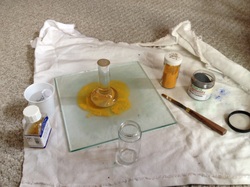
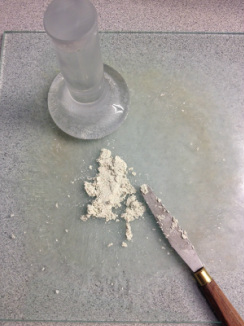
Well, of course, my vacation got busy, and I didn't get back to the experimenting. But I did look over the tests, and it seemed, to me, to not be opaque enough. I had some time today and decided to grab my muller and glass set up and grind the pigment a little more to see if that would make a difference. Grinding is pretty boring, and in period I would have many assistants doing this work. But there is only one way to learn for me, and that is by doing. So grind I did. And grind. And grind some more. More on the grinding later.
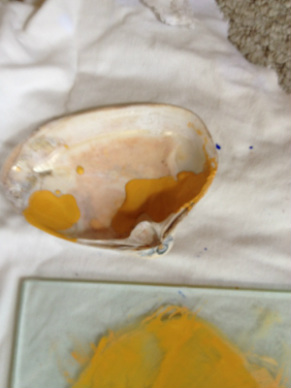 After I felt that it was ground well enough for a second set of test swatches, I scraped it off of the muller and glass and into a handy, dandy shell that I had been keeping around for just such a day. The pigment on the right of the shell is ground with gum arabic, the one on the left is gum arabic with a little silicon carbide to see if that gave it any metalic shimmer. They did not appear much different in the shell, but sometimes you have to wait to see once the paint dries. | 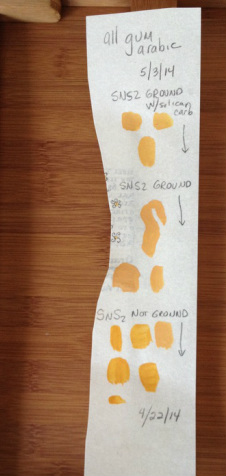 |
The results of the test pieces are to the right above. What I have observed (and you can also, if you can zoom in) is that the ground pigments are more opaque. The silicon carbide did not seem to make any difference, however, I have been told by the scribes on the SCA_Scribes_and_Illumination yahoogroup that adding a bit of mica dust might bring out a metalic look. Not sure yet, that is an experiment for another day.
I did use the mosaic gold on a current project that I am doing. Can't show it yet, but the moment that I can, you will see it here. I will note that the mosaic gold does have a nice shine when it dries and when it is right up next to a combination of cinnabar and lapis lazuli (also ground from pigment), it makes a lovely contrast. I'm pretty happy so far with the results.
I did use the mosaic gold on a current project that I am doing. Can't show it yet, but the moment that I can, you will see it here. I will note that the mosaic gold does have a nice shine when it dries and when it is right up next to a combination of cinnabar and lapis lazuli (also ground from pigment), it makes a lovely contrast. I'm pretty happy so far with the results.
Finally, I decided to go crazy and grind some eggshells to make calcium carbonate. :-) I need a way to have white pigment, but I really am not wanting to work with white lead. No, not a good idea.
Another teacher at work has chickens and had extra eggs so I received them on Friday. Saturday morning, fresh eggs for breakfast and I kept one of the white shells to try out the grinding. I have discovered that there is a technique to the grinding and I am getting better at it. I grind the pigment, then I scoop it back together in a mound with a painters blade and then grind again. Repeat several times. Some things that I learned: I think I needed to leave the egg out to really dry out as the grinding seemed to have too much moisture to it. Also, I read after I did this, that you need to add the binder in and grind it. That will happen next. I have put the finished product in a container and may let it dry again and then re-try grinding with the binder to see if I can get a finer grind. I could use the resulting chalk to paint grounds, but would have to add lime (calcium hydroxide) in order to make it Lime White, which would have been used in period. Lime also has its hazards, so I'll have to look into that.
Another teacher at work has chickens and had extra eggs so I received them on Friday. Saturday morning, fresh eggs for breakfast and I kept one of the white shells to try out the grinding. I have discovered that there is a technique to the grinding and I am getting better at it. I grind the pigment, then I scoop it back together in a mound with a painters blade and then grind again. Repeat several times. Some things that I learned: I think I needed to leave the egg out to really dry out as the grinding seemed to have too much moisture to it. Also, I read after I did this, that you need to add the binder in and grind it. That will happen next. I have put the finished product in a container and may let it dry again and then re-try grinding with the binder to see if I can get a finer grind. I could use the resulting chalk to paint grounds, but would have to add lime (calcium hydroxide) in order to make it Lime White, which would have been used in period. Lime also has its hazards, so I'll have to look into that.
Bibliography
"Pigments through the Ages - Detailed Pigment Histories, Recipes." Pigments through the Ages - Detailed Pigment Histories, Recipes. N.p., n.d. Web. 03 May 2014.
Cennini, Cennino, and Daniel V. Thompson. The Craftsman's Handbook. New York: Dover Pubications, 1954. Print.
"Randy Asplund Illustration Home." Randy Asplund Illustration Home. N.p., n.d. Web. 03 May 2014.
"Why Natural Pigments?" Natural Pigments. N.p., n.d. Web. 03 May 2014.
"Hand Grinding and the Purchase of Materials." Basic Three-Bar Template. N.p., n.d. Web. 03 May 2014.
 RSS Feed
